About this deal
Adjusting the zoom and focus of the microscope is done by twisting the lens shaft and raising or lowering the lens on the arm. By doing this, you change the focus distance and field of view. Stored images have a 4032*3024 (12 megapixel) resolution, despite the microscope only using a 4MP sensor. The images get upscaled to a higher resolution and do not have the same detail as a true 12MP image. Photo Examples
Andonstar Soldering Microscope – Andonstar
Levels Adjustable LED Lights】2 metal base plate side lights, a total of 8 intensity levels of LED lights, the light body can be bent and the angle can be adjusted, which can meet your different requirements for image brightness and lighting angle to get the best image effect.
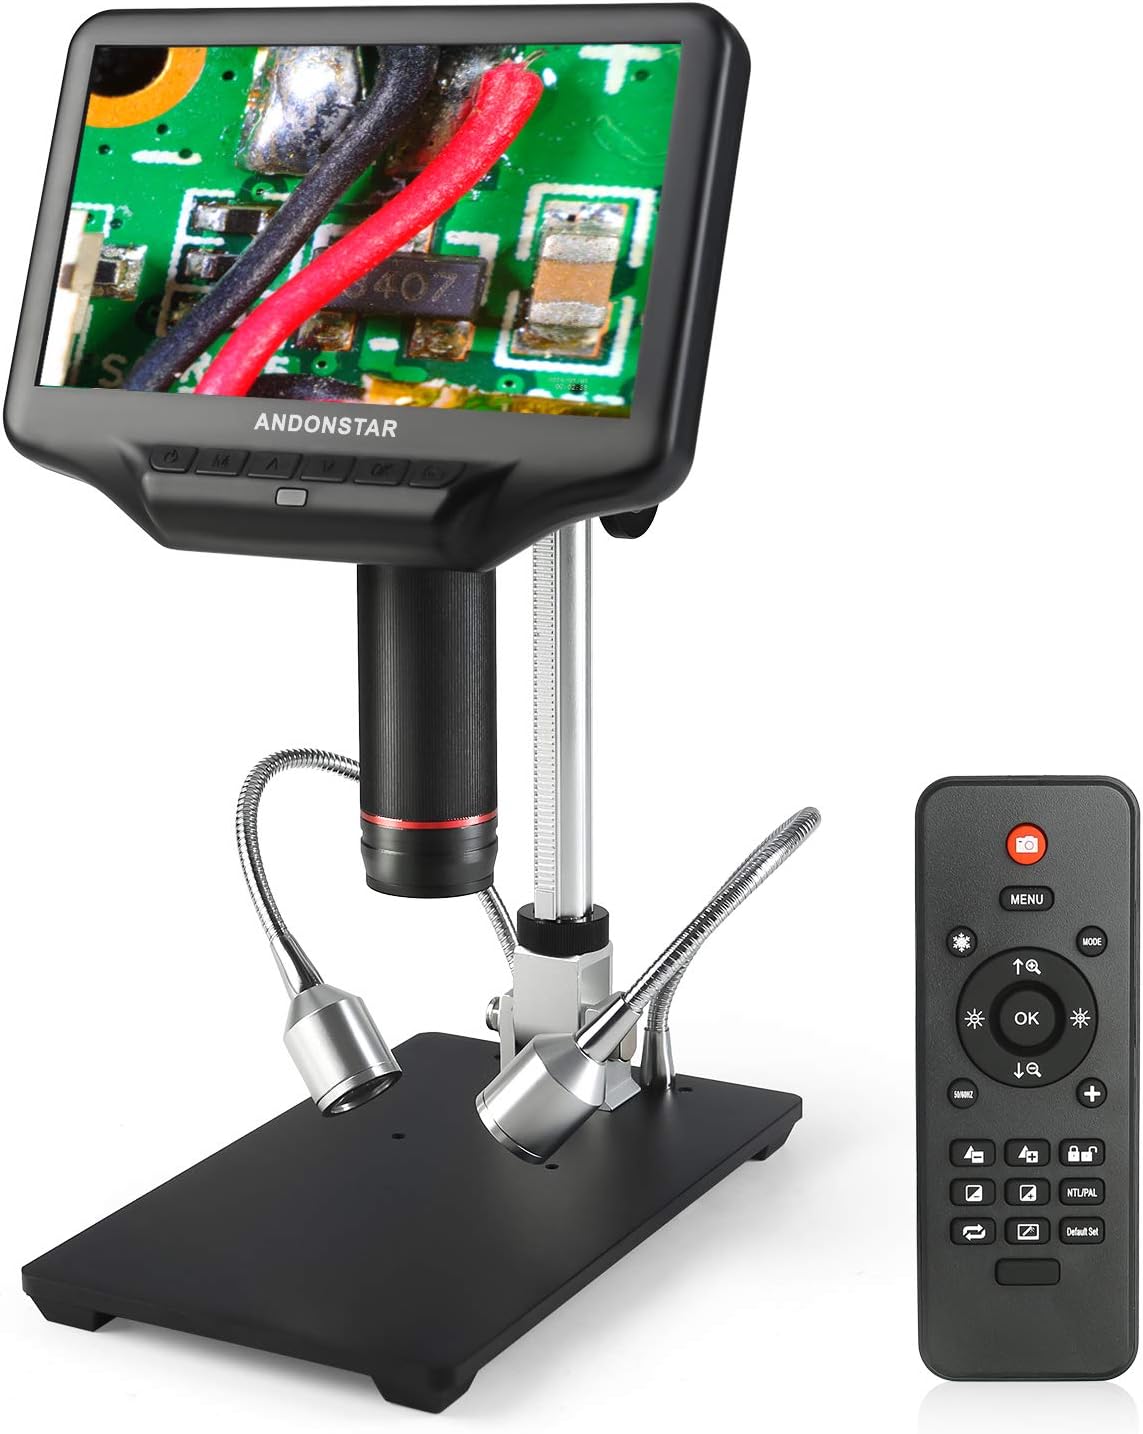
I am not sure if this is officially recommended, as the manual doesn’t mention anything about it, but I have found it to work just fine. The AD407, being the newer version, has better overall features. It comes with a bigger screen and is more responsive, making SMD soldering significantly easier. Its sensor also provides a higher resolution photos and videos than the one on the ADSM302. If the 10 inch screen isn’t enough, you can connect the microscope to an external monitor. That does disable the onboard monitor, though. The microscope offers plenty of space to solder under and has a removable lens and filter so you can add filters or even put on a wide-angle lens. The software of the microscope does what it is supposed to do. You can find several settings for controlling the video output (resolution/frame rate, output frequency, time stamp). There are additional settings that let you alter the image on the built-in screen (3x digital zoom and exposure control). Ultra-high definition 2160P Video Record, 7-inch IPS screen while supporting HDMI output, microscope screen and HDMI screen can display simultaneously that allows you to see a more microscopic world and free your eyes all the time.
Andonstar AD407 HDMI Digital USB Microscope
This is simply amazing, this tiny component as compared to my cell phone is now of the size of a cell phone or even larger, I can clearly see each and every detail. I don’t see any prominent noise. But, if in case you see any noise then you can reduce the situration and contrast values on your TV and it will completely remove the noise. Anyway, using the zoom in and zoom out buttons on the remote controller, you can further increase enlarge the subject. First I am going to start by explaining all the buttons, interfaces,and different parameters, and afterward, I will start a practical demonstration. The included remote is useful for making a photo (or video) without touching the buttons under the LCD screen. Using the buttons can cause movement, resulting in a blurry image. By using the remote you will not have this problem. On the front of the microscope monitor we have got multiple buttons the Power ON/OFF, Mode/Menu, Digital zoom in, Digital zoom out, OK/Start video Record, Picture capture, infrared sensor, and the focus controller.
Customer reviews
The HDMI output is clear and provides you with more detail than the built-in screen, which has a 1024×600 resolution. Usually the built-in screen is more than sufficient just by itself, however. Convenient Wireless Remote Control】It is convenient for you to operate from a long distance and supports functions such as image discoloration and digital zoom. It is especially suitable for demonstrations and other scenes. Easily take photos and videos, and avoid the shake that affects the picture quality caused by pressing the screen buttons. Andonstar AD407 Pro 3D HDMI Soldering Digital Microscope Review and Testing-Today, I am going to review and test the Andonstar AD407 Pro 3D HDMI Soldering Digital Microscope. So, let’s go ahead and start the unboxing and see what’s in the box.
Andonstar AD407 3D HDMI Soldering Digital Microscope with 4MP
Now the same exact thing you can do quite easily while using the remote controller.With the wireless remote controller, it is convenient for you to operate from a long distance, and supports functions such as image discoloration and digital zoom. It is especially suitable for demonstrations and other scenes. Easily take photos and videos, and avoid the shake that affects the picture quality caused by pressing the screen buttons. We also liked that the scope has a remote control so you can operate it without touching it. We’ve used scopes where pushing the buttons to do things like snap a photo sometimes causes vibrations or worse when you are trying to focus on something specific. For each height you can set the lens to (focus distance), there is a specific size area (field of view) visible on the microscope LCD screen. I have listed them below, so that you can get an idea of how big of an area you can view at once under the microscope. Height Insgesamt ganz zufriedenstellend für einen Basteler, aber die Preise für stereo oder sogar Triangular Mikroscope liegen inzwischen nur noch beim Doppelten dieses hier, aber Inkl. Zoom und Boom/Beam halter und halt 2 Optiken, was das Löten vereinfacht, aber nicht gut für die Wirbelsäule ist.This change of mind return policy is in addition to, and does not affect your rights under the Australian Consumer Law including any rights you may have in respect of faulty items. To return faulty items see our Returning Faulty Items policy. High-quality metal lens and focusing barrel】Industrial-grade material, brings you an unparalleled focusing feel and a durable and solid product experience. The screen is probably the most valuable asset of this digital microscope. With its 7″ diagonal it is larger than the screen of the ADSM302 , which has a 5″ screen. The 7″ screen makes it easy to see small details. This is the Power cable, plug in the USB in the Microscope Monitor USB interface. Use the Spotlight interface on the power cable to power up the LEDs.First, plug in the USB into this AC to DC adaptor to supply the required voltage.Press the power button to turn On the Spotlights and the Microscope Monitor anduse these + and – buttons to increase and decrease the brightness. One downside of the remote is that (at least on my unit) I need to point the remote exactly at the IR receiver for it to work. So occasionally I need to re-aim and press the button again if nothing happens. UV Filter
 Great Deal